Sunday, December 19, 2010

Smoked Chicken

For weeks my husband talked about getting a smoker. It all started when he would go across the street and watch our neighbor smoke ribs, turkey and brisket. For weeks he asked questions and did online smoker research on techniques. Just after Thanksgiving, the smokers went on sale so he made his purchase. Soon after he worked a whole morning testing out how fast the water evaporates and what happens to the chips. By one o'clock, he was ready to add a chicken to the smoker. He decided to go with something inexpensive for his first attempt at smoking. Well 4 hours later, we had a juicy bird that tasted fabulous!


First he placed a 5 lb chicken in brine made of 2 quarts of water, 1/4 cup kosher salt, and 1/4 cup sugar for 10 hours. He pat it dry and rubbed it with a mixture of 2 tsp each of Sage, Thyme, Southwest Seasoning, and Herbs De Provence. He did add a little salt and pepper to the rub. He used Pecan and Applewood chips in the smoker with a temperature of 225. He place the bird about 3/4 of the way up in the smoker away from the heat. He smoked it for about 4 hours until the internal temperature was 160 degrees. We let it rest for about 30 minutes before we cut it.


We will definitely make lots of chicken in the smoker. Our daughter suggested making just the legs since they tasted like the turkey legs at the fair! It is a good idea and we will definitely be trying that idea!

Enjoy!

Saturday, December 18, 2010

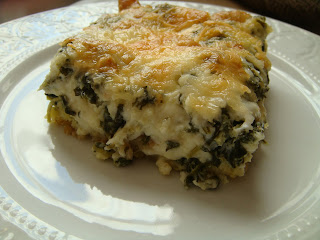
Spinach Cheese Casserole

Everyone usually has one or two traditional food dishes that they have every Christmas. One of ours is Spinach Cheese Casserole. This dish has actually become a MUST have dish for every occassion at the request of my children!! This dish ranks up there with cheesy potatoes and Ida's Greenbean Casserole! I am sure the sky would fall if I did not make it for Christmas.

This recipe goes back about 19 years. My German babysitter always talked about making spinach pie, homemade soups, and German cookies. My sister-in-law gave me a cookbook that her kid's school put together for a fundraiser and the Spinach Pie in the cookbook looked good. I was hesitant since spinach has never thrilled me, but I saw how much cheese was in this recipe and thought, how could this taste bad? It tasted pretty good but I tweaked the original recipe a bit. Over the years, I have found that I have to double the recipe, because one pie plate was not enough! By the way, my babysitter said, This is not pie!". I kind of agreed with her and stopped calling it pie many years ago! Sorry, Carla Beatty from Lines School in Canada, we still love your dish though!!

Spinach Cheese Casserole
CRUST
2 cups seasoned croutons, crushed
1/4 cup melted butter

FILLING
6 tbsp Parmesan cheese
1 10 oz package frozen spinach, thawed and drained well
1 cup small curd cottage cheese
8 oz Monterrey Jack cheese, cut in 1 inch cubes
3 eggs, beaten
1/4 cup chopped onion
2 tbsp sour cream
1 clove garlic, crushed

Press croutons and melted butter into a 9 inch pie plate. Combine 1/4 cup Parmesan cheese with spinach, cottage cheese, Monterrey Jack cheese, eggs, onion, sour cream and garlic. Spoon into prepared crust. Sprinkle with remaining Parmesan cheese. Bake uncovered at 350 for 35 minutes until lightly brown on top.

This recipe can be doubled and baked in a 13x9 baking dish for 1 hour. Casserole will be bubbly when it comes out of oven and will setup after 5 to 10 minutes.

Print Recipe

Enjoy!

This recipe has been linked to

Mommy's Kitchen Potluck Sunday

Friday, December 17, 2010

Wedding Soup

When I married my husband it did not take long for me understand how important making a good wedding soup was to the family. His sister Dodie's soup was excellent and I was not sure I could make soup, let alone a good soup. My husband always talked about wedding soup, he would order it at restaurants and then say it was not right, not like the soup his sister's make. One morning he decided he was going to make the soup. He went to the store and bought the ingredients, consulted with his sister, and then started on his day long adventure to make the soup. He cut vegetables, boiled and boned a whole chicken, and meticulously made perfect little meatballs. It literally took 10 hours for him to make the soup! It was delicious! Seriously though, I thought I do not have time to make this soup!!

Several months later, I came across the recipe and I decided to give it a try. Lo and behold, in an hour and half I was able to make the soup, do two loads of laundry, and clean up the kitchen. I did take a few short cuts but the results were the same.....delicious soup!!

This soup is very good. The flavor is smooth and the soup is hardy so you do not need much else to make it a meal. I have never really cared for spinach, but in the soup it is subtle so I really enjoy it.

Italian Wedding Soup
SOUP
Whole 4 lb chicken, or 2 chicken breasts bone-in, or 4 boneless breasts - (This is where you can save time)
1 onion chopped - I use a very large yellow onion
1 1/2 cups chopped celery
1 cup chopped carrots
2 32 oz containers of chicken stock
10 oz frozen spinach, thawed and drained
1 tsp Italian seasoning
Salt and pepper to taste
MEATBALLS
1 lb ground beef or turkey
2 pieces garlic, chopped fine
1 tbsp parsley
1 tsp Italian seasoning
1 tsp salt
1/4 tsp pepper
1/3 grated Parmesan cheese
1 egg
1/3 cup bread crumbs
DRIZZLE
3 eggs
1/2 cup grated Parmesan
Boil chicken in large pot with enough water just to cover chicken. Add in about 1/2 cup of the onion and little salt. When chicken is falling off bone, or is cooked through, remove from pan and shred. Add the chicken back to the pot, add stock, onion, celery, and carrots.
While this simmers, mix all ingredients for the meatballs and make tiny little meatballs. We like them the size of marbles. When they cook in the soup they are very tender and melt in your mouth.
Bring soup back up to a boil and drop in meatballs. Add spinach. Reduce heat and cook for 15 minutes. This is a good time to add 1 tsp of Italian seasoning and salt and pepper to taste. Beat 3 eggs and 1/2 cup grated Parmesan in a small liquid measuring cup. Bring soup back up to a boil and drizzle the cheese and egg mixture into the soup, stirring occasionally. Cook soup for at least another 15 minutes before eating.
This soup can stay on low heat for a long time and the flavor or texture will not be effected. This soup freezes well. You can re-heat in microwave, or on stove top and it tastes like it was just made.
Enjoy!

Sunday, December 5, 2010

Breakfast Potatoes

While in New York last month, we had these potatoes for breakfast one morning. They have good flavor so I worked to recreate them once I got home. These were pretty easy to make, just make sure you do not over cook the potatoes or they will be mushy. I think the dish we had in New York may have had a little cheese on top. I left it off when I fixed them this time but anything with cheese is good, so next time I will probably add a little cheese. The peppers and onion are not overpowering but give the potatoes a really nice flavor. I don't really care for peppers but I ate this up. As the peppers cook they mellow out and leave the potatoes with a hint of the peppers that adds a really nice flavor.


Breakfast Potatoes

4 medium potatoes, diced
1/4 c. red pepper
1/4 cup green pepper
1 small onion
butter
Lowery's seasoned salt
Paprika
salt and pepper to taste

Melt butter in skillet. Add potatoes, peppers and onion. Sprinkle Lowery's to lightly coat all of the potatoes. Add paprika, salt and pepper to taste. Cook until potatoes are soft.

Enjoy!

Saturday, November 27, 2010

Sweet Potatoes

For Thanksgiving this year, I decided to try something a little different with the sweet potatoes. I usually make them heavy with brown sugar and Cinnamon and they turn out more like a sweet potato pie. I was digging around on the Eating Well website and I found this recipe. The comments about the orange flavoring caught my eye and everyone loved the flavor. This smelled wonderful while I made it. The taste was refreshing and not really sweet. The topping mixed with the sweet potatoes was so good; I did not miss the old sweet potatoes at all.


Sweet Potato Casserole

2 1/2 lbs sweet potatoes (3 medium) Peeled and cut into 2 inch chunks
2 large eggs
1 tbsp canola oil
1 tbsp honey
1/2 c milk
2 tsp freshly grated orange zest
1 tsp vanilla extract
1/2 tsp salt

Topping

1/2 c flour
1/3 c packed brown sugar
4 tsp frozen orange juice concentrate
1 tbsp canola oil
1 tbsp butter melted
1/2 c chopped pecans

Preparation
Place sweet potatoes in a large saucepan and cover with water. Bring to boil. Cover and cook over medium heat until tender, 10 to 15 minutes. Drain well and return to pan. Mash with a potato masher. Measure out 3 cups. (reserve any extra for another use)

Preheat oven to 350. Coat an 8 inch square (or 2 qt) baking dish with cooking spray.

Whisk eggs, oil, and honey in a medium bowl. Add mashed sweet potato and mix well. Stir in milk, orange zest, vanilla, and salt. Spread the mixture in the prepared baking dish.

To prepare topping: Mix flour, brown sugar, orange juice concentrate, oil and butter in a small bowl. Blend with a fork or your fingertips until crumbly. Stir in pecans. Sprinkle over casserole.

Bake the casserole until heated through and the top is lightly browned, 35 - 45 minutes.

Print Recipe

Enjoy!

Friday, November 26, 2010

Appetizers - Cucumber and Celery

This year for Thanksgiving I wanted some appetizers that were easy to make finger foods and could be prepared the night before. I knew I wanted to do something with celery and cucumbers. They are refreshing to eat and you don't really fill up on them. So many of the recipes for stuffed celery have raisins or nuts in them but I found one with cheese and ranch dressing which is a winning combo to me. I also looked for a recipe for cucumber sandwiches. After I made them I realized it was not the taste I remember from parties but this one was not bad. I used white bread party rounds so the bread held up. I actually have a few still in the refrigerator and the bread is still good.


Cucumber Appetizer
8 oz cream cheese
1 pkg dry italian dressing mix
1 c. mayonnaise
1 - 2 cucumbers
Italian baguette, slided thin, or white party rounds
Fresh dill

Mix first three ingredients to make the cheese mixture. Slice cucumbers. Spread cheese mixture on bread and then top with cucumber.

If you use the party rounds, you may assemble appetizers the night before the party. If you use Italian baguette, wait to prepare until same day.

Top with fresh dill.


Celery Appetizer
8 oz cream cheese
8 oz shredded cheddar cheese
3/4 cup prepared ranch dressing
Celery

Mix first three ingredients and spread or pipe into celery. If you are going to pipe the cheese mixture into the celery, make sure cheddar is finely shredded.

Enjoy!

Saturday, November 6, 2010

Simple Macaroni and Cheese

If you struggle with making homemade mac n cheese, this is a simple way to make good old basic mac n cheese.


Simple Macaroni & Cheese
2 (7 1/4 ounce) boxes Kraft macaroni and cheese (Make sure to buy creamy variety)
1 cup milk (plus a little more)
2 eggs, beaten
1 stick of butter
salt and pepper
2 (8-12 ounce) packages cheddar cheese, grated


Boil macaroni until tender, then drain water completely. Put macaroni in a large bowl. While it is still hot, stir in the 2 Kraft cheese packages from the boxes, stick of butter, eggs and 1 cup of milk. Salt and pepper to taste. Macaroni mixture should be creamy and milky. If needed you can add a little more milk. I make sure my macaroni is covered in milk but not floating. This mixes with the eggs and makes a cheesy custard.

Pour half of the mixture into a large baking pan (I use my lasagna pan) and cover with 1 package of shredded cheddar. Pour remaining macaroni mixture into the pan and cover with remaining cheese.

If you like a crumble top, melt one stick of butter and crush a whole sleeve of Ritz or Saltines into the butter and top the casserole during the last 15 or 20 minutes of baking.

Cook on 375° for about 45 minutes, until cheese is golden brown.

Enjoy!

Sunday, October 24, 2010

Chicken Parmesan Bundles

This was such a good meal but my camera was set wrong and the main item is blurry but everything around it was focused. I did not catch it until we ate all of the food. I think the blurry picture still gives you the idea of how yummy this was!

It was so simple to make. I used to be intimated by the pictures of stuffed chicken but once I started to try more recipes I found how simple it is and can't believe I can actually make it look good and taste good.

The flavor of this chicken was incredible! The kids are not really crazy for chicken Parmesan but rolling up the chicken with cheeses and spinach did the trick. I would not have thought about using cream cheese but it made the spinach and mozzarella mixture extra creamy. They ate it up! I served it on a bed of spaghetti with a salad and garlic bread.

I got this recipe out of the Kraft Food and Family cookbook. Click here for recipe. They also have a video on making the bundles and a couple of pictures that people uploaded. If my picture was clear I would have uploaded it. I think it is better than the uploaded pictures. Oh well, next time!


This was a pretty quick meal to prep and cook. It took about an hour.
Enjoy!

Saturday, October 23, 2010

Buckeye Cupcakes

If you need a really quick way to make a cupcake for a football tailgate, these are the ones. They are not a typical cupcake with just frosting on top. They have a surprise in the middle! We are from Columbus Ohio, so you can see how these are appropriate for football season.

We really enjoyed these cupcakes. They are rich with all of the peanut butter and fudge. I used ice cream fudge topping around the peanut butter ball but I think the next time I will use a ganache or a fudge frosting because it will hold up better inside the cake. The ice cream topping just soaked into the cake....which was not bad either.

Ingredients:
Chocolate cake mix
1 cup of peanut butter
1/4 cup butter
1 1/2 cups powdered sugar
Fudge ice cream topping or fudge frosting
Canned chocolate frosting
2 Tbsp peanut butter


Make the cupcakes according to package. Take a small knife and cut a plug out of the top of each cupcake.

Mix 1 cup peanut butter, 1/4 butter and 1 1/2 cups of powder sugar until you get a crumbly mixture. Form into a 1 1/4 inch ball (like the size of a small walnut or a buckeye). Insert a ball into each cupcake. The balls may be larger than the hole you cut, the cake gives as you shove the ball into the center.

If I were going to make a change, here is where I would make it.
To help make these feel more like a buckeye, I added hot fudge on top of the peanut butter ball. In retrospect, I think ganache or fudge frosting would have been better but I was going for quick and easy preparation. Place the plug back on top of the cupcake.


I used 1 1/2 containers of already prepared chocolate fudge frosting to save time. I mixed in about 2 Tbsp of peanut butter. I filled a decorating bag and used a 1M tip to swirl on the icing.
We added colorful jimmies to the top of one for decor and that did not work. It looked a little silly and since we were going after the buckeye feel, we used the crumbly left-over peanut butter filling as a perfect topping.

We cut one open to make sure we did not skimp on the peanut butter filling. I think we did a good job. The amount ended up being perfect and the cupcakes were delicious.


Enjoy!

Saturday, September 18, 2010

Salt and Pepper Popcorn - Product Review

Since I enjoy salt and pepper potato chips, I decided to give Orville Redenbacher's Salt and Pepper Popcorn a try. I have to say that the "Butter", "Movie Theater", or "Kettle Corn" varieties have always been a favorite but I am trying to move toward a healthier snack and since this is whole grain and natural with 120 calories for each mini bag, it seems like a good choice. I found that the pepper gives this popcorn a little kick so you do not miss all of the butter. It is not over powering but just the right amount of pepper. I found this flavor to be just as addicting of all of my favorites. I am still a fan of the butter varieties but I will include the salt and pepper option into my popcorn stash.


Monday, September 13, 2010

Orange Sunflowers

I have to do a quick post about these flowers. They are about 6 feet tall and the heads are small so the plant does not fall over like the regular big yellow Sunflowers. There are around 7-10 heads on each plant and the color is absolutely beautiful. We may have a backyard full next year....if I can figure out what my husband bought! He said they are Russian Sunflowers. When I google that....it seems most sunflowers are called "Russian". I am going to try to save the seeds, wish me luck!

Thursday, September 9, 2010

Nineteen


Lauren's birthday fell on Labor Day this year. This was the weekend she was moving into her college housing so I did not think she would be home, but she made it!! I went to Dairy Queen and picked up a cake so we were able to do a small celebration. The Dairy Queen cake has been a pretty popular request over the years. Chelsea started it way back when and the only time we veer away from the ice cream cake is when we get a fresh strawberry cake from Golden Delight Bakery.

This is her college room. She worked all summer to save her money to buy the furniture! I only pitched in a little as a birthday present. I am proud that she did not waste her money and she bought some nice furniture that she will have for a long time. (There is a cute little nightstand on the other side of the bed.)

Happy Birthday Lauren!

Friday, September 3, 2010

Kiawah Island


In August we went to Kiawah Island South Carolina for our family vacation. It is a beautiful island with hard white beaches. We have been going to Kiawah, off and on, for 25 years and really enjoy every time we can get a beach vacation together.
The island has 30 miles of bike paths, a couple of look out towers, a park and a couple of golf courses. It is lush green with condos, houses and a 5 star hotel.


Since the ride from Ohio to South Carolina is around 12 to 13 hours, we decided this year to break up the ride and stop on the way there and the way back. Our first stop was Chimney Rock North Carolina. This was so neat. We stayed the night at the Mountain Lodge Conference Center in Flat Rock. I was extremely nice, we will stay there again.


Vista Rock was about halfway up the climb to Chimney Rock.
The views were fabulous.
This is TJ on Chimney Rock . We were in the Opera Box
and were able to take a picture across the mountain.

This was Lindsey, Baylee and myself in the Opera Box.

Hickory Nut Falls is about a 1 mile hike. It was pretty flat
and easy to walk.
When we arrived at Kiawah, this was our view. Terrible right?
We stayed at Windswept Villas
The beaches are hard so you can ride you bike on the beach!
This was in Charleston. The pineapple fountain was dry, but
we still had fun.
On our way back to the island we stopped at Angel Oak.
This is the oldest oak tree in the states.
This is one of the lookouts on the island. It looks out
over the marsh.

On our way home we stopped at the Biltmore Estates in Asheville North Carolina. It is a beautiful estate but it poured down rain non stop for 4 hours. We did not get to see everything and enjoy it as much as we should, but these lovely rain ponchos made the visit a little more bearable.

We waded in ankle deep water to the farm and enjoyed the animals.
We toured the estate and went through the museum.
The girls were amazed by all of the stories. We drove
through the gardens, it was too wet to walk.
The vacation was a really good time. We did get wet several times throughout the week,
but all in all, we did have more pretty days than rainy days so we did well!!

Thursday, September 2, 2010

Pig Roast 2010

We had our 4th annual pig roast last weekend and we had great weather! The planning started over 2 months ago with us going through our stock of supplies left over from last year, planning the date, and making the flyer. We were lucky that our supply bins are pretty full since last year's roast was on a pretty popular vacation week so our attendance was down. This year the guys decided to go with a later date so we would be out of those popular vacation weeks. The attendance was about the same as last year so it may not matter what date we pick for next year.


The supplies in the garage the night before.
This is the pig during the second basting. He was on the
roaster by nine and done by four.

This was the tshirt design for this year.
The girls and I always make a piggy dessert!
These turned out great this year!

The carving, pulling and chopping of the pig lasted 1 hour
with 5-6 people working constantly.

The line started around 5:00 pm. There were so many good
dishes brought by neighbors and friends!


We had five tables and chairs setup in the shade.

There were three more tables up by my neighbor's house and
people sat on his deck. There were also several games
setup in the yard!

Additional seating on our patio. At one point we
counted 100 people.

Thanks to all the sponser families. This roast could not have been such a success without you. Your help with gathering supplies, food prep, setup, and clean up was much appreciated. A special thanks to Dave Mangas for making a great basting sauce and keeping that pig basted all day!
I hope everyone enjoyed the 2010 Pig Roast and will come back next year!!

Sunday, August 8, 2010

Pepperoni Knots and Cowboy Salsa

Summertime is always a great time to try out recipes because there are always neighborhood picnics or holiday gatherings. A couple of weeks ago we were invited to a big pig roast. This is the second year we have attended this roast and it was a great time. We also have a pig roast every year, so it is fun to go to other pig roasts to compare or get ideas on what makes the roast great.

When we showed up, the couple's large property was covered with about 100 people. Their property is about 10 acres so it was not too crowded but it was amazing to see people spread out over the lawn with blankets, coolers, strollers, and bag chairs. There was plenty for everyone to do. There was a pond for fishing, kayaking, and swimming, a barn that housed the food, a basketball court, several bean bag toss games and some PVC pipes that people put beer bottles on and tried to knock them off with a frisbee. There were also several really nice sitting areas through out the property that included porch swings. Then to top off the evening, there was a large firework display at dark.

I decided to make two recipes to take with us. One was a new recipe and the other an old standby. I found a recipe in the Rachel Ray magazine that looked good but I did not have all of the ingredients. I made a few small changes and they turned out pretty good so I packed them up for the roast. They are a little savory roll that are quick to make and were gone in about 10 minutes. The other recipe is for a tomato, corn and black bean salsa that is addicting. I filled a tin loaf pan up to the rim with the salsa and it was also gone quickly. I like the addition of the corn and beans to salsa. It is refreshing and the flavors go well together along with looking pretty!


Pepperoni Knots
2 oz pepperoni, finely chopped
2 cloves garlic. finely chopped
1 13.8 oz tube refrigerated pizza dough
1 egg, beaten
Coarse salt

Preheat oven to 400 degrees. Grease a baking sheet.
In a small bowl, mix the pepperoni and garlic. Cut the dough by cutting the tube length in half, then cut each piece in half and continue to cut each piece in half until you have 16 pieces. Roll each piece of dough into a 7 inch long rope. Tie each piece into a knot and place on the prepared baking sheet. Brush each knot with egg and sprinkle the pepperoni garlic mixture on top. Add it on thick because as they cook they will rise and the sprinkles will spread out. Top off each roll with coarse salt. Bake until golden, about 18 minutes. These can be served with a spicy mustard or pizza sauce.


Cowboy Salsa

1 can black beans (drained and rinsed)
1 can shoe peg corn
1 28 oz can dices tomatoes
1 bunch cilantro, chopped
3-4 green onions, chopped
1 pkg italian dressing mix

Mix together all ingredients.

Print Recipes

Enjoy!

Strawberry Marshmallows - Product Review

We were at Target when I saw strawberry marshmallows and immediately thought how yummy marshmallow treats would be if they were strawberry flavored. I made the treats that night and I was a little disappointed. There was not much flavor. Afterwards I was thinking that I should have cut up strawberries and stuck them in the bars, but then again I could do that using regular marshmallows. So I guess my suggestion would be to pass on the strawberry marshmallows, the cheaper store brand marshmallows do the trick just fine.

I am still thinking about the fruit mixed into marshmallow treats......that could be interesting.

Saturday, July 17, 2010

Pasta Stuffed Chicken

I am trying to get back into cooking and baking. Over the past several months, I have not had much time or desire and then when I would cook something, it would be a flop. I am not sure if it was due to lack of patience or if a person can just get rusty at what they are doing. I am hoping I am on a good path and starting to get my groove back! I found this recipe in a magazine. I ripped out the page and there is no identification anywhere on the front or back of the page to say what magazine it was. I guess it will not really matter because I adapted the recipe a little.

This is a little like Chicken Parmesan but instead of the chicken resting on a bed a spaghetti, the pasta is on the inside of the chicken. It was really good and I am sure I will make it again. It was not difficult to make.....remember I am going through a phase right now, and I was able to make it turn out!!!


Chicken Stuffed with Pasta

1/2 cup small shell pasta, like Ditalini
1/2 cup shredded mozzarella cheese
1/2 cup ricotta cheese
1/2 cup grated Parmesan cheese
1/2 cup coarsely chopped flat leaf parsley
salt
2 large eggs
2/3 cup italian breadcrumbs
4 boneless chicken breasts
3 cups marinara sauce ( I used Classico tomato basil sauce)

Preheat oven to 350 degrees.

Cook pasta according to their directions. While the pasta is cooking, combine the cheeses and half of the parsley in a bowl. Drain pasta and add the hot pasta to the cheeses; season with a little salt.

Prepare a 2 quart casserole dish with about 2 cups of marinara sauce spread in the dish. It will be about an inch thick in the dish. The chicken will bake on top of the sauce.

In a shallow bowl, beat the eggs. In a separate bowl or plate, place the breadcrumbs. Pound out the chicken breasts until they are about 1 inch thick. Place a spoonful of the cheesy, pasta mixture in the middle and roll. I used toothpicks to hold the chicken together because we will browning in a skillet before placing in the oven to thoroughly cook.

Heat up a skillet with a little oil over a medium heat. Dip the stuffed chicken breasts in the egg and then in the breadcrumbs. Place in the skillet and brown all sides. You are just doing this to get the chicken brown, not to cook all the way through. Place the browned chicken in the marinara sauce and place any of the left over pasta in the middle between the chicken. Bake for 30 minutes or until the meat thermometer reaches 165 degrees. During the last 5 minutes of cooking add some mozzarella and parsley to the top of the chicken.

While the chicken is baking, heat up the rest of the marinara sauce to be served with the chicken for those who like extra sauce.


Enjoy!